Pages Side

Saturday, November 26, 2022

SSRS : How to Install SSRS and Configure IT Step by Step (Video)

By the below, you will learn how to install SSRS step by step to prepare it to get start and build your reports,
Below,it's the first lecture in SSRS course which is transfare how to install SSRS and configure it


Power BI: How to Edit SQL Query In Power BI step by step


 Able to update the existing SQL statement, you have to follow the below Steps :

You are Open to DashBoard Power BI Desktop

1- go to Query Editor Home>>Transform Data >> Transform Data


2- Open Query Setting   On the Left side you will fine the query List, Select which one you want to edit

3- Open Query Setting   On the Left side >> Query Setting >> Select the Source

4-Click on the Setting icon gear beside the Source to edit the Query Source


5-it will open SQL Server database settings would be shown, you can edit your SQL statement as you prefer


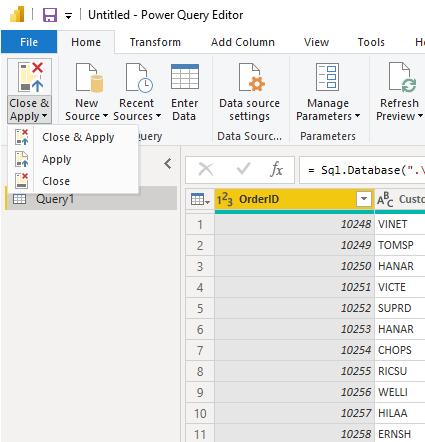
6- Then Close & Apply to effect on your Dashboard


Thursday, November 24, 2022

Power BI: Loading Data From Folder

 Open up PowerBI Desktop and click on the Get Data button and select All on the left side.  Click on the item labeled Folder and click Connect to continue

 Click OK to continue. Upon opening that folder location you will be presented with the multiple files.  Click Edit to edit the query


Edit Query for Folder Load

Now you are in the Query Editor.  This is where the fancy query editing will work to our advantage.  We could load all the data into one large query.  However, depending on the size of your data sets or how you want to report your data this may not always be desirable.  Instead, you may only want data from April, then May when the new data is sent next month.

Note:  When using PowerBI desktop it is a good practice to name the files  beginning with a YYYY-MM-DD file name.  This makes it really easy when sorting and ingesting information into PowerBI.  I have used other columns of information such as Date Accessed or Date Created before but have gotten inconsistent results as these dates can change depending on when a file was moved or copied from one place to another.

Click the drop down next to Name and sort the files in Sort Descending.


This places the files with the most recent file at the top of the list.

Next click on the Keep Rows button on the Home ribbon, select Keep Top Rows.


Enter the number 
when the popup appears.  Click OK to continue.


Keep Top Rows Menu

Now you’ll notice you have only one file selected which is our latest file from April.  Click the Load File button found in the Content column.


Load File Button

We have completed the activities in the Query Editor and can now load the data.  Click Close & Apply found on the Home ribbon.  All our April data has loaded.  by making a simple table we can now see all the data that was just loaded.


Loaded Data from April

Now we will remove some data from our desktop folder labeled monthly data.  Open the folder on the desktop labeled Monthly Data and delete the filed labeled 2016-04-01 April.  You should now have a folder labeled Monthly Data with only two files in it, one for Feb and one for March.


Two Files Left

Return back to Power BI Desktop and click the Refresh button on the Home ribbon.  Notice now how all our data has changed.  We are now looking at the March data because it is the most recent file in our folder based on the file name.


March Data Load

To verify this we open the query editor (Click the Edit Queries on the Home ribbon).  Click Refresh Preview on the Home ribbon and finally select the Applied Step called Kept First Rows.  This will reveal the month of March as our data source.


Now, every time you add a new file to our folder and refresh PowerBI the latest file (based on the naming convention we talked about earlier) will always be loaded.

Note: This method works great when your data source is coming from an automated system.  The file format must always be the same for this to work reliability.  If the file naming convention changes, or the number of columns or location of those columns changes then the query will most likely fail.

Good luck and thanks for following along.


Tuesday, November 8, 2022

EPM: How To activate Project Server Subscription Edition, 2019, or 2016


1- Open the SharePoint Management Shell as Administrator.

2- Verify that you have the following memberships:

  • securityadmin fixed the server role on the SQL Server instance.
  • db_owner fixed database role on all databases that are to be updated.
  • Local Administrators group on the server on which you are running the PowerShell cmdlets

3-From the PowerShell command prompt, type the following syntax to enable Project Server Subscription Edition, 2019, or 2016:


Check for a Project Server Service Application

  • Project Server runs as a service application in SharePoint Server, so the first thing to do is check to see if you already have a Project Server Service Application configured.
  • In the SharePoint Central Administration website, under Application Management, click Manage service applications.

Check the service applications list for a Project Server Service Application. 


Sunday, November 6, 2022

SSRS: Keep headers visible when scrolling through a paginated report


To prevent row and column labels from scrolling out of view after rendering a paginated report, you can freeze the row or column headings.,


1- On the design surface, click anywhere in the table to display static members, as well as groups, in the grouping pane.


The Row Groups pane displays the hierarchical static and dynamic members for the row groups hierarchy, and the Column groups pane shows a similar display for the column groups hierarchy.


2- On the right side of the grouping pane, click the down arrow, and then click Advanced Mode.


3- Click the static member (row or column) that you want to remain visible while scrolling. The Properties pane displays the Tablix Member properties.

4-In the Properties pane set FixedData to True.


5-Repeat this for as many adjacent members as you want to keep visible while scrolling.

6-Preview the report.


Monday, August 3, 2020

Setup Active Directory on Windows Server 2016

How to Configure AD DS (Domain Controller)

Steps to setup Active Directory

  1.   From the Server Manager Dashboard, click on Add roles and features.
  2. Select Role-based or feature-based installation and click Next.

  • 3. Select the server by highlighting the row and select Next.
4. Click Add Features
5. You shouldn’t have to select anything at the Select features, so just select Next.
6. Click Next in the AD DS section.
7. On the confirmation window, review everything and then click Install.
8. The installation will begin.
9. When the installation is complete, you need to now promote the server to a domain controller.
10. Click Promote this server to a domain controller (small hyperlink in the results window)
11. Or, if you are like me and you clicked Close, click on the yellow exclamation mark in the upper-right section of the Server Manager Dashboard.
12. 
Select Add a new foresttype in a domain name that you want to use (pro-tip: use something like <something>.internal), then click Next.

13. Type in a password you want to use for DSRM, then click Next.
14. Click Next on the NDS Options page.
15. Click Next in the Additional Options page.
16. Click Next on the Paths sections.
17. Click Next on the Review Options screen, then click Install on the Prerequisites Check page.
18. 
The installation (promotion process) will begin. The server will reboot during this process.
19. When the installation is complete, log back in (this time you will be logging into the server with domain credentials).
20. Let’s verify Active Directory is setup and our server is classified as a DC (domain controller).
21. From within Server Manager, click Tools then Active Directory Users and Computers.
22. Expand the domain root (in my case, it’s TESTDOMAIN.internal), then click on Domain Controllers.
23. You should see your new server being displayed.
24. One last thing I want to do at this point is enable RDP (Remote Desktop Protocol).
25. From Server Manager Dashboard, click Local Server then click Disabled next to Remote Desktop.
We are done with the basic Active Directory setup Only to help us in development or test environment 

Saturday, September 6, 2014

Organization Browser web part

by default the Organization Browser working on my site only but It's not working in different web application 

To add Organization Browser Web Part in different web Application ;you have to do the below steps

1. Active SharePoint Server stranded Site Collection feature under Site Setting>Site Collection features 

2. go to your page where you want to add the Web Part and insert it


Note : In SharePoint 2013, It has a problem in rendering but you can add the below script in content editor web part under Organization Browser web Part (Microsoft reference ) to resolve it
<script type="text/javascript">
 function CreateHierarchyChartControl(parentId, profileId, type, persistControlId) {
  var i = profileId.indexOf("|");
  var claimsmode = profileId.substr(i-1,1);
  if((i >=0 ) & (claimsmode=="w"))
  {
   profileId = profileId.substr(i+1,profileId.length-i-1);
   var initParam = profileId + ',' + type + ',' + persistControlId;
   var host = document.getElementById(parentId);
   host.setAttribute('width', '100%');
   host.setAttribute('height', '100%');
   Silverlight.createObject('/_layouts/ClientBin/hierarchychart.xap',
    host,
    'ProfileBrowserSilverlightControl',
    {
     top: '30',
     width: '100%',
     height: '100%',
     version: '2.0',
     isWindowless: 'true',
     enableHtmlAccess: 'true'
    },
    {
     onLoad: OnHierarchyChartLoaded
    },
     initParam,
     null);
    }
  }
</script>